Friday, January 30, 2009

Rosemary roasted potato cubes with quick beef stir frys


Before I take a month long break from my food blogging, I thought I'll post something quick and simple, good when you're cooking for one.

Unfortunately, my rosemary pot has died, after being eaten by bugs, and suffering from 2 weeks of drought. So I had to use dried ones, which is not so bad though.

The roasted potato recipe comes from Jamie's guide to making me a better cook. It's quite straightforward, so after cooking it once, you can almost remember how to do it without referring back to the recipe.

To complete the meal, I did a quick stir fry of beef and onion, in the same pot used for boiling potatoes. In this way, I minimised my washing.

Rosemary Roasted Potato Cubes with Quick Beef Stirfry
Serves one

2 small washed potatoes, cut into 1 cm cubes. Keep skin if they're washed
Rosemary
olive oil
3 cloves garlic, crushed
a handful of sliced beef
1 onion
salt and black pepper

Preheat oven to 220 degree Celsius.

Cut potatoes into cubes. Put them into a pan of cold water and boil. When potatoes are boiling, drain in colander and leave to steam for a while.

Meanwhile, put olive oil on a roasting tray (or oven proof pyrex dish) and put into the oven to heat up the oil.

When the oil is hot, take out the tray and toss potatoes, rosemary, crushed garlic. It'll sizzle like teppanyaki which is kinda fun. Season with salt and pepper. Return to oven and bake for 20-25 minutes. Stir or shake the potato cubes once in a while to help in achieving a golden crispy texture.

Just before the potatoes are done, heat a little olive oil in pan. Fry onions until they are soften and a little brown. Add beef and fry for about 2 minutes. Season with salt and black pepper. Add a little water if you find it drying too much.

Toss the beef stir fry into the potatoes and serve.

And of course, you could cook something else to go with the potatoes.

Tuesday, January 27, 2009

Confiture d'abricots


Our jam making experiment continues...

Being penny-wise when it comes to jam-making, Rémi calculated that the cost of making 4 bottles of jam is cheaper than what we paid for 1 bottle.

Making your own jam can be extremely mind blowing. May even be revolting to the health conscious, when right in front of your eyes, you see the jam-maker pouring one whole pack of sugar into the pan, which were to later concentrate into four tiny bottles. So it's more than being penny-wise to spread your jam as thinly as possible.

While Rémi may disagree with me, as he still considers his strawberry jam experiment a success, I firmly believe that his apricot jam was much much better than the strawberry one. In fact, it's as good, or even better than what you can find on supermarket shelves. So if you're going to make jam for the first time, I reckon making apricot jam is a safer guarantee of success, than strawberry. We don't know about other fruits until we try them.

The recipe comes from Rémi's maman.

Apricot Jam (Confiture d'abricots)
Makes approx. four 300ml bottles

1 kg apricots
750g sugar
125ml water

Remove the pits from the apricots. Cut into quarter slices.

Dissolve sugar in water and simmer for 10 minutes over medium heat.

Add the apricot slices and continue to simmer for about 30 minutes or until the syrup has thickened and mixture has set. To check, spoon some jam onto a cold plate, if it moves very little, it is done.

Pour immediately into clean, sterilised bottles. Seal immediately and invert the jar to cool down. Check if seal is airtight by pressing the centre. If it flexes, refrigerate and use like any opened jam you buy.

Peaches Poached in Red Wine


If you have leftover red wine that's too good to throw away, but too bad to drink, the rule is to keep it.

You can always trust the French to find a happy solution to their excess, undrinkable wine. They come up with this home device called a vinaigrier, a big clay pot where they pour their unwanted wine from the top and drains good wine vinegar through a tap at the bottom. I would imagine it takes more than the blink of an eye to ferment wine into vinegar, but the idea is there.

Anyway, I do not possess a vinaigrier, but I do always keep a bottle of red and a bottle of white for cooking. Cheap one that is.

And yesterday, being the first day of Chinese New Year, I was determined to have a nice dinner, after sorely missing the festive tradition of feasting the night before. To digress more than a bit, we had wanted to fish for abalone and sea urchin on Sunday but luck wasn't with us. Ended up buying a pack of fresh sea urchins at the supermarket. It tasted wonderful with just bread and butter, but come on, it's New Year's eve which called for a better feast beyond bread and butter. So we followed a random recipe found on internet, cooked pasta with white wine sauce and sea urchins. It totally ruined the strong, delectable taste of the sea urchin and left me extremely unsatisfied.

So I was determined to have a good dinner last night. Nothing fancy, just some French style 'garlicy' roast lamb from Camille and Jamie's rosemary crispy baked potatoes, which made me happy to want to try again and post the recipe next time. And there must be a nice conclusion to the dinner.

Camille came to the rescue once again. Strangely, this cookbook in French was a present for Rémi, but I seem to be using it more than ever. Frequent enough to understand enough of the ingredients list before I tediously type the steps of suitable recipes on google translate.

This recipe is a must try, because it's easy and amazingly wonderful. A scoop of vanilla ice-cream may bring you to the moon, but as we didn't have any last night, we're still on earth today.

Peaches Poached in Red Wine (Soupe de Péches au Vin Rouge)
Serves two

2 ripe peaches (Idea is 1 big peach per person, so it's straight forward to adjust the quantity)
2 tablespoons sugar (you may like to reduce your sugarly sins here)

120ml red wine
Another 4 teaspoons of sugar (or 4 sugar cubes)
1/4 teaspoon cinnamon powder or 1/4 cinnamon stick

Peel the skin off the peaches and remove the pits. Cut into halves or quarters. Coat the peaches with the big spoons of sugar. Leave in a cool place for an hour.

After an hour or so, you would see a sweet syrup forming around the peach slices. This peachy syrup is crucial in enhancing the taste of the red wine syrup, so make sure you don't skip the first step.

Then, boil the red wine and the 4 teaspoons of sugar and cinnamon for 10 minutes over low heat. Add the peach slices and the sweet peachy syrup into the wine syrup. Continue poaching for about 15 minutes. The wine syrup should have reduced by about half.

When it's done, leave to cool in fridge before serving. Wonderful.

It should be possible to replace peach with pear.

Monday, January 26, 2009

Baba au Rum without Rum


Contrary to its name, this cake is not an Arabic cake invented by Ali Baba. Neither is it a Peranakan cake (early Chinese settlers in the Malay peninsular who intermarried with locals and their male offsprings are known as Babas).

As history goes, the Baba Rum cake is linked to this deposed Polish king in France. In exile in Lorraine, he found the Kugelhopf (a cake roughly similar to the baba and common in Alsace-Lorraine) too dry for his liking and soaked it in rum. Delighted with the resulting taste, he named it after Ali Baba. Or at least, this is one version of the origins of the cake.

Traditionally, the cake is made using yeast as the rising agent, but this recipe that I had from Rémi's mom can be substituted using baking powder, which makes it more manageable. In order for children to enjoy the cake without breaking the alcohol age limit, I simply omitted rum in the sugar syrup, and had in place a sweet plum cum coffee syrup from my coffee encyclopedia cookbook.

Baba au Rum without rum
serves six

125g flour
60g sugar
4 eggs, whites separated, brought to room temperature
1 tablespoon milk
1 teaspoon baking powder
1 hazelnut size of butter (as translated from the French recipe)

Syrup
4 plums, stoned and thickly sliced
100g sugar
120ml water
120ml coffee

Beat egg yolks and sugar together until the mixture becomes pale yellow in colour. Add milk, flour and baking powder.

Preheat oven at 160 degrees Celsius.

Beat egg whites until firm and stiff. If the eggs come from the fridge, make sure to bring them to room temperature before making the meringue.

Fold the egg white mixture into the sugar and yolk mixture. I found this part tricky and used the electric beater, but instead causing the resulting cake texture to be denser than desired. As the sugar and yolk mixture is very thick, while the egg white mixture is very delicate, a more proper way is to scoop 1 or 2 spoons of meringue and stir strongly into the yolk mixture, so that the texture becomes smoother. After that, fold the rest of the meringue gently into the yolk mixture.

Butter the ring cake mould generously.

Pour cake mixture into the cake mould and bake for about 20 minutes.

Meanwhile, prepare the syrup. Melt 25g sugar in water. Add the plums and cook over low heat until the plums are almost tender. Remove plums and add the remaining sugar and coffee to the pan. Heat until sugar are dissolved but do not boil.

When the baba cake is cooked, leave to cool for 5 minutes. Then dunk the cake in the warm syrup until well soaked. Let it drip dry on a wire rack or whatever.

To serve, fill the middle with fruits, like the plums and topped with cherries. Spoon extra syrup over the cake and serve with Chantilly cream or plain yoghurt.

As seen from the picture on left (cake done by Rémi's mom), after soaking the cake with sweet syrup, you could also pour Chantilly cream over the whole cake and fill the inside with strawberries and raspberries. This is the expert version.

Tips:
It is also possible to use canned peach or apricot for this cake, and use the syrup straight from the can.

Saturday, January 24, 2009

Down-to-earth, traditional Macarons de Nancy


My second Macaron attempt has been more successful. This time round, I ditched fanciness and opted to make more ordinarily-looking macarons, which is realistically more achievable for an amateur cook like me.

Macarons de Nancy is a specialty of Nancy (a city in France), said to be baked by nuns seeking refuge in the region during the tumultuous French Revolution. It's also made up of egg whites and ground almonds but less fanciful than the colourful sandwiched macarons common in Parisian patisseries.

I got my recipe from Camille's French classic cookbook, but did not follow through her exact proportion. Learned also that in French, when they said "sucre en poudre", literally translated as powdered sugar, they don't mean icing sugar, but just fine castor sugar. Well, my icing sugared macarons still tasted yummy, and added some Chinese New Year festive spirit to my kitchen routine.

Macarons de Nancy
makes about 30 cookies

150g ground almond
150g fine castor sugar
2 egg whites
2 tablespoons clear honey
a few drops of almond essence

Mix ground almond and sugar together. Add the rest of the ingredients, mixing well with a wooden spoon. Original recipe asks for 200g of ground almond and sugar, but as I was using normal size eggs, and also not having enough ground almond, I find 150g sufficient. But be prepared to adjust quantity up if your dough is too liquid.

Refrigerate for 3 hours.

Preheat oven to 120 degrees Celsius.

Line a cookie tray with baking paper. Take a pinch of the dough and roll into a small ball. Flatten on the tray. Space each cookie about one inch apart to allow room for expansion.

Bake for 20 to 30 minutes, until golden brown. Leave to cool for 5 minutes before transferring them to air tight container. The inside should be a bit soft and chewy.

It is possible to substitute ground almonds with dessicated coconuts.

Thursday, January 22, 2009

Experimenting with Chocolate Macarons


I haven't been keen on trying out macarons for a long long time, despite requests to do so. Yes, they are very French. And they look so daintily pretty and dainty looking desserts are not something I am good at. I do not also like to use food colouring. I am averse to eating food that looks too artificially coloured, and sometimes go to the extreme of pinching away that little red dot that marks a char siew bun.

Finally, my deeply frozen egg whites were calling out to me to use them, and I bravely decided to attempt making macarons all on my own. I faithfully stuck to the recipe and instructions by David Lebovitz, an American pastry chef in Paris, whose blog I've enjoyed reading since discovering it.

It was tedious and messy to pipe out the paste without a proper pastry bag and tip, especially without my chief food licker to help clean up the remaining batter stuck to bowls and spoons. As seen from the photo, my attempt wasn't too successful either. All of them cracked when they should not be, and they didn't have the 'foot'. As each oven has its own quirks and temperament, I may have overbaked one minute too long or 10 degrees too hot. So my macarons weren't crispy outside and soft inside, as I think it should have been (but I can't really remember how it should be, this is going to be on my list of things to eat for my upcoming trip to France). For the filling, I used this delicious honey and hazelnut spread bought during our South Island trip.

I also discovered that the most original macarons come from Nancy region, made by nuns. Camille's cookbook has a recipe, and I'm still contemplating whether to make it today with my remaining 2 egg whites.

Wednesday, January 21, 2009

Cheesy way of using up leftover rice


I've just found a cheesy way of using up my leftover fried rice, and pleasantly pleased with the result. Now I do not have to always cook Chinese fried rice to use up my leftover grains.

I found this recipe "Peppers with Rice, Feta and Pine Nut Stuffing" in my The World Encyclopedia of Cheese, which I'm going to add to my list of frequently used cookbook. Long neglected, it actually consists of a treasure trove of useful, easy to cook recipes.

I had quite liberally adjusted the recipe to my needs, which worked very well. Other than capsicums (bell peppers), it is possible to use tomatoes, portobello mushrooms or zucchini to stuff the rice in. And for those without an oven, you could possibly forgo the baking stage. The rice tasted good even before baking.

Peppers stuffed with Rice, Feta and Pine Nuts
Serves two

2-3 large bell peppers (mixture of colours would be good)
half to one cup leftover rice (or whatever you have)
1 carrot, grated
1 onion, chopped
2 garlic cloves, crushed
1 tomato, chopped
2 large button mushrooms, chopped
sprinkle of pine nuts
sprinkle of raisins
feta cheese, crumbled (quantity depending on how cheesy you want your rice to be)
1 tablespoon fresh parsley, chopped
sprinkle of freshly grated Parmesan cheese
salt and ground black pepper

Preheat oven to 190 degrees Celsius.

Cut the peppers in half lengthways and remove the cores and seeds. Bring a large saucepan of water to boil. Add the peppers and boil for 5 minutes. Remove and leave to drain upside down. If you're unsure of how many peppers you need to hold your rice stuffing (like me), you could hang on and blanch whatever number of peppers you need only after frying the rice.

Heat olive oil and sauté the onions and garlic until onions are softened. Stir in the mushrooms, carrot and tomatoes. Season with salt and pepper to taste. Cook for about 5 minutes, then mix in the rice, feta, pine nuts, raisins and parsley.

Spoon the mixture into the blanched peppers, sprinkle over the Parmesan and bake for 20 minutes.

If using tomatoes to stuff the rice, spoon out the flesh of tomatoes. Keep the flesh for frying with the carrots and rice.

Monday, January 19, 2009

My DIY plastic bags holder


While it is absolutely inedible, this candied felt bag or box (however you see it) is an integral part of my aim to keep my kitchen tidier.

I draw my inspiration from those plastic plastic bag holders by Ikea, which has many holes for you to draw out plastic bags. But first, there's not a single Ikea in the entire New Zealand (whose presence would otherwise drive the local furniture industry out of business). Second, my kitchen cabinet is not big enough for its tall holder anyway.

Stiff felt is the chosen material as I like it. Also, it holds the shape, yet is more resistant to water than paper. The shocking pink colour was chosen by Spotlight, as that's the only colour available. I combined it with my leftover black and fuchsia pink felt from an earlier project to make cup coasters, so that the final colour combination is less shocking.

On the same trip to Spotlight, I have bought a cheap wine red 6 ply cotton thread, intending to use it to sew the felt pieces together. And a piece of off-white thick textile from the clearance bin, wanting to use it as a table cloth for food photography. As I was drawing the threads out of the textile to create a fray effect on both ends, I collected enough thread to sew my felt box together! Even more cheapo (whole project costing less than S$5, with leftover materials for next project).

So, a good part of Sunday afternoon was spent sewing the felt pieces together using box stitches. The size of the box is partly determined by the size of the felt, which I had halved to form each face. A strip connects the top face of the box to better hold the shape of the box together. Plastic bags are loaded from the top. A hole is cut through one of the face of the box, so you could draw plastic bags out, like tissue paper. This is the part where you can be creative. Rémi rejected my suggestion of cutting a heart shape out of the hole. So the next easiest design I could think of is making a sweetie pie looking flower.

I even contemplated hanging the box from the ceiling. But well...

Saturday, January 17, 2009

Mushroom and Blue Cheese Pasta


When I was a kid, I knew only two types of cheese: Kraft and Cheesedale Cheese. Both are cheddar cheese, but it doesn't matter. I had enjoyed a slice on my toast, with tuna, in burgers, on the Jacobs cream crackers, or just on its own. As I grew older, I learned that Mozzarella and Parmesan are good for pasta and pizzas. And there's this Philadelphia cheese that I made my cheesecake with.

French food culture is as much about cheese, as it is about wine. So you can imagine that there's a very steep learning curve for me in terms of cheese, and I may be able to rattle off only a dozen more names of cheese at most. My lame attempt in understanding cheese led me to buying this book titled "The World Encyclopedia of Cheese" a few years back.

While I have barely read its informative explanation of different varieties of cheeses, I have found this blue cheese pasta sauce that Rémi tried and we enjoyed last night. We did not use Gorgonzola as suggested by the recipe, but with another type of blue cheese produced locally. New Zealand is afterall a cow and sheep country.

Bon apetit!

Mushroom and Blue Cheese Pasta

Pasta

Sauce:
Olive oil
Fresh mushrooms (about 150g)
1 garlic clove, crushed
100ml cream
100g blue cheese (eg Gorgonzola), crumbled
salt and ground black pepper
1 tablespoon chopped fresh parsley
chopped walnuts

Cook pasta according to packet instructions.

Heat oil in pan and sauté the mushrooms for 5 minutes. Add garlic and cook for 1-2 more minutes.

Stir in the cream, bring to boil and cook for 1 minute. Stir in the cheese but do not boil. Adjust consistency of sauce with water, according to your own preference. Season and toss with cooked pasta.

To serve, toss in the walnuts and parsley.

Those who can't stand the strong smell of blue cheese can happily omit it from this recipe, as mushroom and cream still go well together. It's just like having wanton noodles without wantons.

Friday, January 16, 2009

Black Pepper Beef and Aubergine Roll


I must have been possessed last night to have tried to create this dish.

It started with some recipes cutouts from a Chinese magazine (probably UW), given to me by PY. I was possessed by this Black Pepper Beef and Enoki Mushroom Roll recipe. But wait, enoki mushrooms (looking like golden needles, thus its alternate name) in New Zealand are classified as "exotic mushrooms", hence six times more expensive than in Singapore.

So, I fancied coming up with my own black pepper beef roll, magically paired with aubergine (eggplant). Except that I forgot it requires much more work. But still, Rémi and I had enjoyed the resulting dish very much.

Black Pepper Beef and Aubergine Roll
Serves 2-3

1 large aubergine (eggplant)
100g beef, thinly sliced (quantity varies, depending on how meaty you want it to be)
half to one red chilli, chopped (I have low tolerance for chilli)
2-3 cloves garlic, chopped
few dashes of ground black pepper (recipe in the magazine asks for 3g! Who in his right mind will measure 3g of black pepper?!? First and foremost, you need a very fancy digital kitchen scale.)

Seasoning:
3 teaspoon light soya sauce
1 teaspoon tomato sauce
1 teaspoon dark soya sauce
1 teaspoon Chinese rice wine
1 teaspoon sugar
1 teaspoon corn starch
water (start with 2 tablespoon, but you'll find yourself adjusting the consistency of the sauce along the way)


Slice the aubergine lengthwise, about 1/2 cm thick (this is one of the most difficult part for me). Sprinkle salt and leave for half an hour in a colander. Pat dry with paper towel after that.

The aubergine has to be stir fried separately first, and I'm improving on my healthy way of doing this. A recipe has asked for lots of oil, but I find that it resulted in the first slice of aubergine soaking up most of the oil, leaving the rest unevenly coated in oil.

What I've found effective (and healthier) is to add a little oil to heat in the frying pan. Using a brush, brush the oil across the pan. Also, brush all the aubergine slices individually, on both sides with oil. Pan fry about 3-4 slices at a time, turning so both sides are browned and cooked. Set aside on a plate lined with paper towel.

With just a little oil, fry the beef slices quickly until cooked (or medium done). Takes about 2-3 minutes. Set aside to cool too. If you decide on a beef-enoki mushroom combi, you could roll them two up before frying. If using aubergine, the beef gets hidden inside the aubergine and doesn't cook evenly, hence I fry them separately.

The beef would have oozed out meat juices. Add garlic and chopped chilli. Stir fry until fragrant. Add seasoning and black pepper. Add about half cup more water for more sauce and allow sauce to thicken.

Meanwhile, roll up the beef and aubergine slices together. I rolled aubergine slices around the beef, but feel free to be creative here.

Add the beef rolls into the sauce.

You can serve with plain rice or cous cous. This could be a party food. Simply pin up the aubergine and beef roll with toothpick to secure and serve, and with sauce served separately.

Strawberry Conserves


I imagine that the commercial jam market in France is very small. Even though it has a population of 61 million, and most of these 61 million Frenchies probably have jam on toast for their breakfast everyday.

Why do I imagine so? Because French grany and maman (French for grandmother and mother) make their own jams, jars and jars of them. And they do jam exchange within the family, grany to maman, and maman with aunts for variety of flavours. And the mamans will in turn distribute these lovingly made jams to their city dwelling children. So who needs to buy jam in this country? Especially when homemade jams come with deliciously chunky pieces of real fruits!

(Well, there is still a commercial jam market in France, and one popular brand is called "Bonne Maman", translated into Good Mother. This brand of jam contains chunky fruit pieces almost like mom's. It's sold in Singapore supermarkets too, and no surprise that we've tried almost all the flavours.)

When making jam, French mamans buy big quantities of fruits. You can trust them on knowing where to buy seasonal fruits cheaply in bulk. And they are usually too ripe to be eaten on its own but perfect for jam-making, which is why they are cheaper too.

Being well into the fruity season in New Zealand, we reckon it is time to try our hands in jam making. Especially after finding 1kg of strawberries selling cheap at the Sunday market.

Our jam recipe comes from, who else, but Rémi's maman. While we reproduce the trusty recipe she has been using here, we still have to check with her on how to improve. Our jam looks more like strawberry preserves -- very liquid, with whole strawberries floating in the thickened liquid. But it's perfect with plain yoghurt. To spread on toast, just smash the extremely soft strawberries over it.

A few words on sterilising the jam jars. Put clean jars into boiling water for 10 minutes. Let them drip dry. Then pour the hot jam into the jars, cover tightly immediately and invert right away. The steam from the hot jam is supposed to kill bacteria in the remaining pocket of air. And the expanding heated air will make the jar air tight. If you suspect that air has sneaked in, then store in fridge and use immediately. Otherwise, the preserved jam can keep for a long time in your store cupboard.

Strawberry Conserve/Jam

2 kg strawberry
1.5kg sugar
250ml water

Wash strawberries and carefully remove the stalk.

Put them in a large pan with water. Cook over low heat for 30 minutes, stirring occasionally.

Add the sugar and stir to mix evenly and cook 25 minutes. When it's done, store into jam jars.

Some after thoughts:
1. Traditional recipes used by mamans are always amazingly brief in details. We may have missed out the obvious step, which is to cut the strawberries into chunky pieces first (can't really blame us, we had very small strawberries, and Rémi still insists that keeping strawberries whole are better).
2. Strawberries are known to not set well. So some recipes call for adding a spoon of pectin-rich fruit (raspberry, apple, black currant, gooseberry) jam into the conserve mixture to help the gelling)

Tuesday, January 13, 2009

Making Sago Gula Melaka without recipe


Gula Melaka is essentially palm sugar. It is golden brown and usually comes in tube form. And it's a commonly used ingredient in Malay desserts.

I don't know who named the sugar after the famous historic town in Malaysia or why, as palm sugar has a different name in Indonesia. And in our foodie hunt through Malacca's old town area a couple of years ago, we found and tasted more chendol than Sago Gula Melaka. Nevertheless, the best sago gula melaka we've tasted so far in our memory was found in Malacca too.

While we have yet to re-create the best Sago Gula Melaka, it is still a simple to make dessert that will satisfy anyone craving for it.

Our problem is, we never stick to any recipe when we make this dessert. It's easy to find so many different versions on the internet, and we always end up with our own improvised version each time. Easier too, no need to remember proportion as there's none.

Sago Gula Melaka

about 100g sago - good for 4-6 ramekins. a few recipe say 200g, it's too much. just decide how many 'cups' you want to make, and remember that the sago expands during cooking.

coconut milk - unless you're using santan squeezed from fresh grated coconut, it is impossible to specify how much water to go with the coconut milk, as different brands of canned/packed coconut milk/cream have different consistencies. As a rough guide, mix about 1 cup coconut milk to 1 cup water, or rather, mix in the water slowly. The resulting milk shouldn't be too diluted or overly thick.

Gula Melaka or palm sugar - they are almost impossible to cut to the exact weight you want. Perhaps half a block for 4 persons? I know I'm not being helpful here.

2 pandan leaves - Asian grocery stores in Western countries amazingly sell frozen pandan leaves. I bought a pack, and been using it for so many dishes, most notably nasi lemak and chicken rice.

Sago:
Starting with sago, soak in water for 5 minutes. Cover entirely with lots of water in saucepan (you'll rather have more water than not enough, excess water will be drained away later anyway).

Cook until the sago have almost all turn translucent. Stir continuously to prevent sago from sticking to the bottom of the pan. Using a metal sieve, run sago until cold water to remove excess starch. This will keep the sago pearls separate from each other.

Pour the cooked sago into individual moulds or ramekins and refrigerate.

Gula Melaka syrup:
Tie 1-2 pandan leaves into a knot. Cut the gula into small pieces and place with pandan leaves in small saucepan. Add about 2-3 tablespoons of hot water. Over low heat, melt the sugar mixture. Srain and remove the leaves. Refrigerate.

Coconut milk:
Boil briefly the coconut milk with 1-2 pandan leaves. Strain and remove the leaves. Refrigerate.

To serve, unmould the sago. Pour the Gula Melaka syrup and coconut milk over. Rémi and I still couldn't agree on the most beautiful way to serve the dessert. Having a dessert glass certainly helps.

Experimenting with Chinese duck


I reckon my stir-fry bitter gourd (or bitter melon or 苦瓜), cooked with sliced pork and black bean sauce, looks nicer, but I'll talk about my experiments with cooking duck the Chinese style.

New Zealand may be too duck friendly. We see ducks everywhere, by the city waterfront, in botanical garden ponds, by the sea, in the lakes and wetlands. After all, it had been a country of birds with no land mammals for millions of years. Until the European settlers came and flooded the isolated island with sheep and cows.

The Kiwis love admiring their ducks, I supposed (well, I too can't stop taking pictures of them). But so much so that it doesn't seem to feature on their platter. I search high and low for duck meat in their supermarkets, but only found chicken and turkey. It's a big crisis, as how am I able to hone my Chinese and French culinary skills without knowing how to cook their famous duck stews or comfits.

Thankfully, the Asians came to the rescue, and I finally bought a big fat and oily Chinese duck home. Made 2 Chinese duck dishes out of it over 2 dinners with leftovers for next meal. Yum yum. Also learned in the process that duck meat is best stewed as long as possible.

First recipe, Duck Soup with Salted Vegetables, is a Teochew dish, from "Reviving Local Dialect Cuisines" by Pang Nyuk Yoon. I felt that I could have simmer longer than an hour for a tenderer meat. I didn't take any photo, was busy savouring the soup.

Duck Soup with Salted Vegetables
1/2 duck
salted vegetables (kiam chye, which is preserved mustard)
2-3 tomatoes
3 dried tamarind slices (assam)
Water
3 slices galangal
2 salted plums
salt and pepper

Rinse duck and chop into large chunks. Remove as much fats as you can -- trust me, the duck is verrrrry OILY. Cook in boiling water for about 10 minutes. Remove to drain (I omitted this step, hmmm...maybe it helps to remove oil).

If using dried assam slices, soak in water until soft. I used assam paste, so not necessary. Cut salted vegetables and tomatoes in large chunky pieces.

Pour water or stock into pot. Add duck and everything else except tomatoes and seasoning. Bring to boil and simmer over low heat for about an hour or more, until the duck meat is tender. Add tomatoes. Depending on the saltiness of the salted vegetables, season duck soup accordingly.


The above Duck Stew with Black Sauce was inspired by Enda's delicious duck stews. She used to cook this duck dish with very thick, dark, sweet and spicy sauce. So I got her to tell me how she did it before coming to New Zealand. But it didn't turn out as I had imagined, as I wasn't sure what kind of dark sauce she used. I ended up using a mixture of dark sweet sauce (kecap manis) and dark soy sauce.

The stew is done, first by stir-frying about 2 large onions and a few slices of galangal. Add the duck pieces, followed by whatever dark sauce. Followed by water to cover and simmer for hours until tender. I used my newly bought slow cooker and stewed the duck for some 6 hours. Very nice. Remove surface oil with a lader if it doesn't appeal to you.

And as we had some leftover egg noodles from lunch, we mixed them with the duck stew. Side dish was the bitter gourd stir fry.

Mission when I go back to Singapore: get the right duck stew recipe from Enda.
Another mission: Improve my photography skills of Chinese dishes.

Monday, January 12, 2009

Discovering Dukkah


We discovered this delicious Egyptian dry mixture of chopped nuts, seeds and Middle Eastern spices and flavors at a Christmas market in Wellington.

We love festive markets like this, as it's a chance to experience new flavours and tastes, especially local produce, home-made jams, dips and honey. It's like going to a Japanese supermarket, where you get to sample different food products, all for free. And it's no surprise that we ended up buying a lot of stuffs.

This Dukkah mix of sesame, almonds, sunflowers, garlic, oreganum and basil has lasted us quite some time. To enjoy, dip your bread into extra virgin olive oil (or avocado oil), then onto the nuts. Yum yum.

When to enjoy? Do like the French do, with their endless courses for dinner. Start with Dukkah as "apperatif". This is before the formal dinner, when everyone relaxes in the living room or garden with finger food or snacks. It's common to invite friends for just chitchat over "apperatif" without the dinner option. Less work to do in the kitchen.

After which the dinner begins with starter, main course, cheese, desert and ends with coffee or tea (and small slice of chocolate).

My first tart - Tomato and Olive


It's not a joke. Despite having posted so many tart and quiche recipes, I've not made the tart dough myself thus far. What you've seen (I mean the shell) were all done by Rémi.

So, last Friday, I surprised Rémi with my first tart (or rather quiche). I had wanted to cook a simple dinner in advance, so tart/quiche is one of the best option. And preparing the tart dough turned out to be pretty easy. Requires two additional step than crumble, that is, to gather all the crumbs together to knead into a dough (very fast), and to roll out.

The tomato and olive quiche (the recipe calls it a tart) comes from a newly acquired cookbook "Appetizers, Finger Food, Buffets and Parties", but the same publisher as my ultimate fish cookbook. Also same as my chocolate and coffee cookbook (I seem to be collecting the whole series, having another soup cookbook as well). It's recommended for picnics and buffets, and you can also make a rectangular one to make it easier to divide into portions.

And not surprisingly, tomatoes and black olives go well together.

Tomato and Black Olive Quiche
serves two

half pâte brisée tart dough (I froze the other half and uses a small tart tin)
1 egg, beaten
100ml milk
1 tbsp fresh basil (or parsley)
2 plum tomatoes
2 tbsp cheese, into small cubes (I used feta, but would have loved to try with blue cheese or camembert)
olives, pitted
salt and ground black pepper

Preheat oven to 190 degrees Celsius.

Prepare tart dough. Roll onto prepared tin and poke with fork. Bake for 15-20 minutes until cooked.

To make the filling, beat eggs with milk, seasoning and herbs. Slice tomatoes and olives. Add to the cooked tart and pour over the egg mixture.

Bake in oven for about 40 minutes, until the filling is golden and just firm.

Thursday, January 08, 2009

Simply Garlic Mushrooms


There are days when you just want an easy quick dinner, and last night was one of them.

I love garlic and mushrooms, and garlic mushrooms is a happy marriage between two of my several dozen favourite ingredients.

Then, my potted parsley is growing so well it's time I should give it a little trim. I highly recommend the growing of parsley. A friend told me it's almost like a weed, which makes growing easy. And it gives you parsley anytime you like, rather than buying a big bag in the supermarket and not being able to finish using it.

This dish is normally served as an appetiser, so to make it substantial and fitting for main course, I added carrots and serve it with cous cous (easier and faster to cook than rice). Makes a perfect vegetarian meal, though I think adding crispy bacon bits would also taste great. Children will like it too.

Recipe inspired by my Olive Oil cookbook.

Simply Garlic Mushrooms
serves two

about 300g (rough estimation) fresh mushrooms (I used white button here, but brown, portobello or mixed would be delightful too)
1 carrot
4 cloves garlic, or as much as you like
3 tablespoons olive oil (it's good to be generous here for this dish)
a little lemon juice (optional)
crispy bacon bits (optional)
salt and black pepper
2 tablespoons chopped fresh parsley

Slice mushrooms thickly. Cut carrot into thin strips. Chopped garlic.

If you're using bacon, fry them first until crispy. Set aside.

Heat oil and sauté garlic until lightly browned but not burnt. Add carrots and allow the carrots to soften slightly. Add mushrooms and stir until well mixed and mushrooms cooked. Add a little water (maybe 1-2 tablespoon) to get some juicy mushroomy gravy to go with cous cous.

Season with salt, pepper and chopped fresh parsley. Add bacon bits if using. Drizzle with some lemon juice if you like a more tangy taste.

To cook cous cous (for the beginner), add 1 cup boiling water to 1 cup cous cous. Season with a little butter and salt and cover for about 10 minutes. Stir well before serving.

Wednesday, January 07, 2009

Fuss-free cooking for one with noodles


I often have to cook for myself alone. And you won't see me boiling instant noodles most of the time. Neither am I expert in making enough variations of salads. Plus I love hot lunches. So noodles and rice feature frequently in my lone meals.

It's definitely boring to cook and eat alone, and worst part is the washing after. So rule number 1: minimal utensils, just one pan/pot will do. So I tend to avoid pasta (which requires one pan for boiling pasta and one pan for cooking the sauce/ingredients).

Saving grace is that Asian noodles come in a variety of shapes, styles and tastes. And many noodles, like fresh egg yellow noodles, fresh white flat kuay teow, and dry ones like tang hoon, bee hoon just require soaking for a few minutes at most.

The ingredients that go into the noodle dish are just as versatile as the dish itself. I usually mix and match 3-4 items from my fridge and pantry. Meat wise, I go for frozen prawns (fast to defrost), minced pork (to make tasty pork balls for soup) or frozen fish balls. For vegetables, carrots and cabbage are favourites, as they are usually the longest lasting vegetable in my fridge, being able to keep for 2 weeks and never seem to be able to finish them. Bok choy, bean sprouts and other greens are used as well. Then, there's onions, garlic, tomatoes, mushrooms that I always have stock for. Just rotate the permutations and I have something different each day.

I also rotate the use of different gravies, sauces and soups -- oyster sauce, black bean sauce, dark soya sauce, chicken stock soup, black pepper style, sambal chilli, sweet sauce....

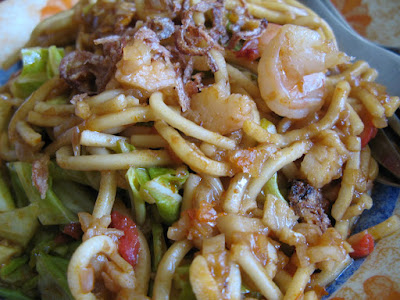
Picture above is my maiden attempt at Mee Goreng (fried noodles). May not look the best, but still quite tasty. Had bought a 500g pack of fresh yellow noodles, cooked over 3 times, from Chicken Stock Soup Noodles with vegetables and egg, to Black Hokkien Fried Noodles with Gravy, to Mee Goreng style with sambal chilli.

Here's my variation of Mee Goreng, with recipe adapted from Nancy Seng's "Indonesian Kitchen", tweaked also according to the ingredients I had at the time of cooking it.

Mee Goreng
Serves one

About 100g yellow noodles (as a rough guide, one and half handful serves one person)
1 cabbage leaves, thick shreds
2-3 prawns, halved lengthwise
3-4 pieces of surimi slices (seafood sticks)
1 small cup of chicken stock
sweet soy sauce (kecap manis)
salt
2 cloves garlic, chopped
1 shallot, chopped
1 teaspoon sambal chilli

Rinse and drain the noodles with hot water. Rinse again with cold water. This helps to prevent the noodles from becoming gluey when you cook them.

Heat cooking oil and sauté garlic, shallots and sambal chilli until fragrant. Add half the chicken stock, allowing to boil. Add the cabbage and cook until soften. Add the rest of the ingredients and stir fry until well-mixed.

Toss the noodles and fry evenly. Add the rest of the chicken stock, sweet soy sauce and salt, quantity according to taste. Mix well.

Dish out and garnish with fried shallots.

Tuesday, January 06, 2009

Fast and easy Cherry Clafoutis


Just back from a fulfilling, beautiful trip to the South Island of New Zealand. One of the highlights of this two-week trip is to indulge ourselves with berries and cherries.

On our road trip around Golden Bay, Nelson and Marlborough region, we were lucky to pass by many fruit farms. Interestingly, most of these farms operate by honesty box. Their produce are kept in a fridge in a little kind of "outpost". You just help yourself and is expected to pay honestly. We had to empty out our coin purse to get our hand on the berries.

While we didn't manage to try all the berries, I really enjoyed the blackberries and boysenberries. Best of all were the chilled cherries, which were huge and very sweet. We had more than 2 kilos of cherries, including the kilo that we brought back to Wellington.

Originally, we thought of making cherry jam, but since we have also bought lots of homemade jam and honey during this trip, we opted to make a Cherry Clafoutis, from a recipe from Camille.

Clafoutis is a custard-like French dessert, made out of a pancake-like batter, and baked with cherries. It's so fast to make that Rémi's mother usually prepares it within 10 minutes. But instead of cherries, she uses this small red berry called griotte. It's sour, so the sweet custard is supposed to neutralise the sour taste.

Cherry Clafoutis
Serves 2-3

300g black cherries (or more, to fill up the tin)
100g flour
50g sugar
250ml milk
50g butter
pinch of salt

Preheat oven at 180 degrees Celsius.

Melt butter with milk over low heat.

In a bowl, mix sugar, flour and salt and pour the hot milk gradually to prevent lumps from forming. The dough should have a creamy consistency.

Butter a tin generously (we use our approximately 20cm diameter ceramics tart tin). Spread the cherries around the tin (be as generous as you can). Some people prefer to remove the pits of the cherries, while some would argue that the pits release a wonderful flavour when cooked. Whatever it is, we leave the pits as they are and just spit them out as we eat the cake.

Pour the batter mixture into the tin and bake for 40 minutes.

Note that fruits like apricot, berries, plums can be used in place of cherries.
 
visits